
ChatGPT has become immensely popular for its ability to answer seemingly any question. While most users access ChatGPT through the ChatGPT website, it is possible to build a PowerShell script that submits queries to ChatGPT.
- A Note About ChatGPT API Costs
- How To Create a Secret Key
- The ChatGPT-Conversation Script
- A Less Complex Version of the Script
- Two Key Concepts: Role Assignments and Message History
- Initializing the Script
- The Initialize Message History Function
- The Invoke-ChatGPT Function
- The Script's Main Body
- Conclusion
You can use this technique to build a variety of ChatGPT-enabled tools for your organization’s specific needs. In this article, I will show you how to build such a script.
A Note About ChatGPT API Costs
Before we proceed, it’s important to note that while ChatGPT itself is free to use, the ChatGPT API, which is what PowerShell uses to interact with ChatGPT, comes with a cost. Each query made by your script using the API incurs a small charge. For detailed pricing information, you can refer to the OpenAI pricing page.
As you review the ChatGPT pricing details, you will notice that it is based on the number of tokens used in each interaction. Later in this article, I will explain how you can adjust your script to optimize and limit the number of tokens used.
How To Create a Secret Key
The first step for building a ChatGPT-enabled PowerShell script is to generate a secret key.
Normally, when you access ChatGPT through the web interface, you sign in using a username and password. However, when using a PowerShell script to access ChatGPT, you will need a secret key instead of a username and password.
Here’s the easiest way to generate a secret key:
- Log into ChatGPT using the usual web interface.
- Go to this “Build your application” page: https://platform.openai.com/docs/quickstart/build-your-application
- Scroll down the page until you find the "Create New Secret Key" button, as shown below in Figure 1.
- Click on the button to generate your unique secret key.
There is nothing difficult about creating a secret key. Simply provide a name that you want to associate with the key. In Figure 1, for example, you can see that I used “Example” as the key name. It is worth noting, however, that once the key is generated, you must keep a record of the characters that make up the key. ChatGPT displays the key only once, and there’s no way to retrieve or look up the key’s contents later on.
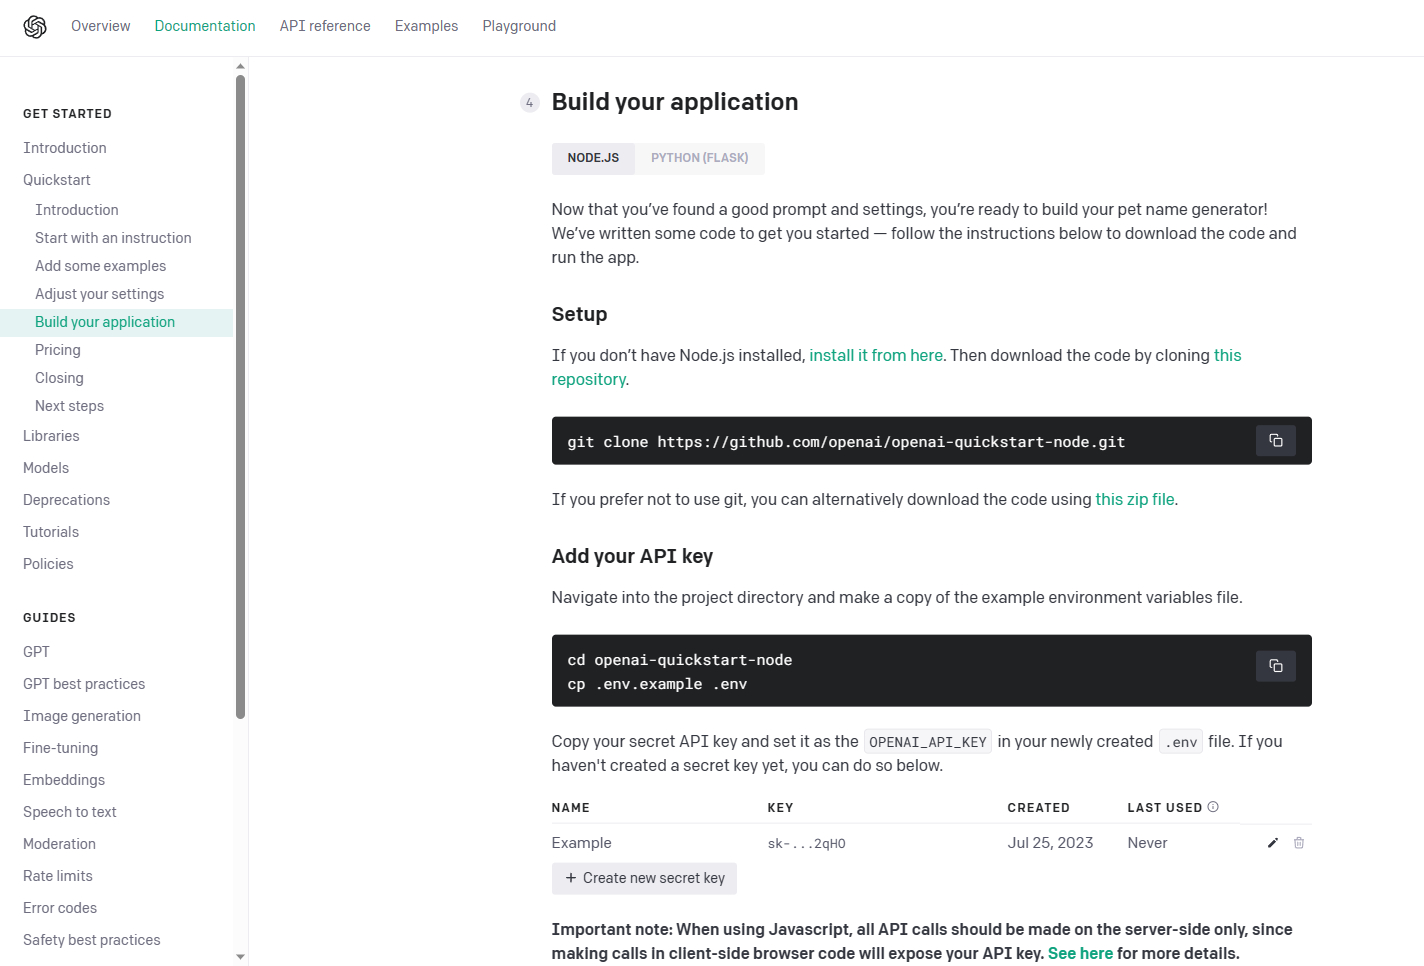
Figure 1. Click on the Create New Secret Key button.
As mentioned earlier, using the ChatGPT API incurs a cost. When you create a ChatGPT account, OpenAI gives you a small credit, which allows you to experiment with the API. Be aware that these credits do eventually expire. If it has been a while since you created your ChatGPT account, there’s a good chance that the credits have expired, even if you haven’t used the API.
In such cases, you must add a payment method to your account before being able to use the API. Otherwise, if you try to use the API without sufficient credits or payment information, PowerShell will generate an error message like the one shown in Figure 2. The message indicates that you have exceeded your current quota and advises you to check your plan and billing settings.
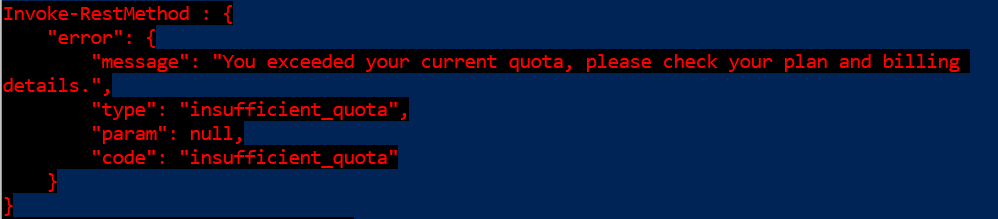
Figure 2. Unless you have a paid account or an account credit, PowerShell will generate a message like this one.
To avoid billing surprises, you can set up usage limits for your account. To do so, just go to OpenAI’s usage limits page and specify the maximum amount of money you are comfortable spending per month.
The ChatGPT-Conversation Script
Once you have generated the necessary API key, and verified your account status, you can move forward with building the PowerShell script.
Before doing so, I recommend visiting GitHub to download the ChatGPT-Conversation script. This PowerShell script allows you to engage in a conversation with ChatGPT directly from PowerShell. To use the script, locate the line of code near the beginning that defines the $ApiKey variable, then insert your API key there.
Starting with this prebuilt script is highly recommended because it is known to work correctly. Using it, you can verify that everything is good with your OpenAI account before you write your code. Figure 3 shows an example of what the script looks when executed.

Figure 3. This is what the ChatGPT-Conversation.ps1 script looks like when executed.
A Less Complex Version of the Script
For this article, I am going to use the ChatGPT-Conversation.ps1 script as a starting point. However, I am going to remove any unnecessary code, stripping the script down to its most basic elements so that all it does is send a query to ChatGPT and display the response. After presenting my modified version of the script, I will walk you through it, allowing you to adapt the technique to your own PowerShell scripts.
Below is my stripped-down and slightly modified code:
# Define API key and endpoint

$ApiKey = ""

$ApiEndpoint = "https://api.openai.com/v1/chat/completions"


<#

System message.

You can use this to give the AI instructions on what to do, how to act or how to respond to future prompts.

Default value for ChatGPT = "You are a helpful assistant."

#>

$AiSystemMessage = "You are a helpful assistant"


# we use this list to store the system message and will add any user prompts and ai responses as the conversation evolves.

[System.Collections.Generic.List[Hashtable]]$MessageHistory = @()


# Clears the message history and fills it with the system message (and allows us to reset the history and start a new conversation)

Function Initialize-MessageHistory ($message){

    $script:MessageHistory.Clear()

    $script:MessageHistory.Add(@{"role" = "system"; "content" = $message}) | Out-Null

}


# Function to send a message to ChatGPT. (We need to pass the entire message history in each request since we're using a RESTful API)

function Invoke-ChatGPT ($MessageHistory) {

    # Set the request headers

    $headers = @{

    "Content-Type" = "application/json"

    "Authorization" = "Bearer $ApiKey"

    }


    # Set the request body

    $requestBody = @{

        "model" = "gpt-3.5-turbo"

        "messages" = $MessageHistory

        "max_tokens" = 1000 # Max amount of tokens the AI will respond with

        "temperature" = 0.7 # Lower is more coherent and conservative, higher is more creative and diverse.

    }


    # Send the request

    $response = Invoke-RestMethod -Method POST -Uri $ApiEndpoint -Headers $headers -Body (ConvertTo-Json $requestBody)


    # Return the message content

    return $response.choices[0].message.content

}


# Show startup text

Write-Host "######################`n# ChatGPT Powershell #`n######################`n` " -ForegroundColor Yellow


# Add system message to MessageHistory

Initialize-MessageHistory $AiSystemMessage


#    This is where you get to ask a question


    # Capture user input

    $userMessage = Read-Host "`nYou"


    # Add new user prompt to list of messages

    $MessageHistory.Add(@{"role"="user"; "content"=$userMessage})


    # Query ChatGPT

    $aiResponse = Invoke-ChatGPT $MessageHistory


    # Show response

    Write-Host "AI: $aiResponse" -ForegroundColor Yellow


    # Add ChatGPT response to list of messages

    $MessageHistory.Add(@{"role"="assistant"; "content"=$aiResponse})
Two Key Concepts: Role Assignments and Message History
Before I start explaining the code step-by-step, there are a couple of important concepts to cover.
The first concept is that of roles. ChatGPT is all about conversations, and both you and the AI engine have distinct roles in that conversation. Therefore, it’s necessary to explicitly define these roles.
Your role is that of a user. You can see the user role being referenced in this line of code:
$MessageHistory.Add(@{“role”=”user”; “content”=$userMessage})
In the line of code, you assign your role as a “user” and add your input (contained within the $userMessage variable) to the Message History object.
The message history is another concept to understand. When you interact with ChatGPT through the web interface, you might have noticed that ChatGPT keeps track of your queries. Similarly, when you invoke ChatGPT through PowerShell, your queries are stored in the $MessageHistory object.
Even if you have no intention of keeping a record of the conversation, you will still need to create a $MessageHistory object. This is because ChatGPT’s responses are also added to the message history, and displaying those responses requires referencing the message history.
As shown in the previously discussed line of code, submitting a query to ChatGPT involves adding to the message history by specifying a role (in this case, your role in the conversation) and your query, which is formally known as the message content.
When ChatGPT generates a response, it is also added to the message history. Just like your input, ChatGPT’s response is associated with a role. The difference, however, is that you get to pick ChatGPT’s role in the conversation, which essentially controls ChatGPT’s personality.
In the provided script, ChatGPT’s role is set as “you are a helpful assistant.” However, you have the option to replace this text with a concise phrase of your choice. This allows you to make ChatGPT humorous, sassy, or any other personality trait you prefer. Let me demonstrate how it works.
In Figure 4, you can see that I asked ChatGPT, “What is 2+2.” ChatGPT responded with the correct answer. Next, I modified the role statement in the code, changing the line from “you are a helpful assistant” to “you are a humorous assistant.” After this change, I asked the same question again. This time, ChatGPT still provided the correct answer but with a bit of attitude, showcasing its updated personality.
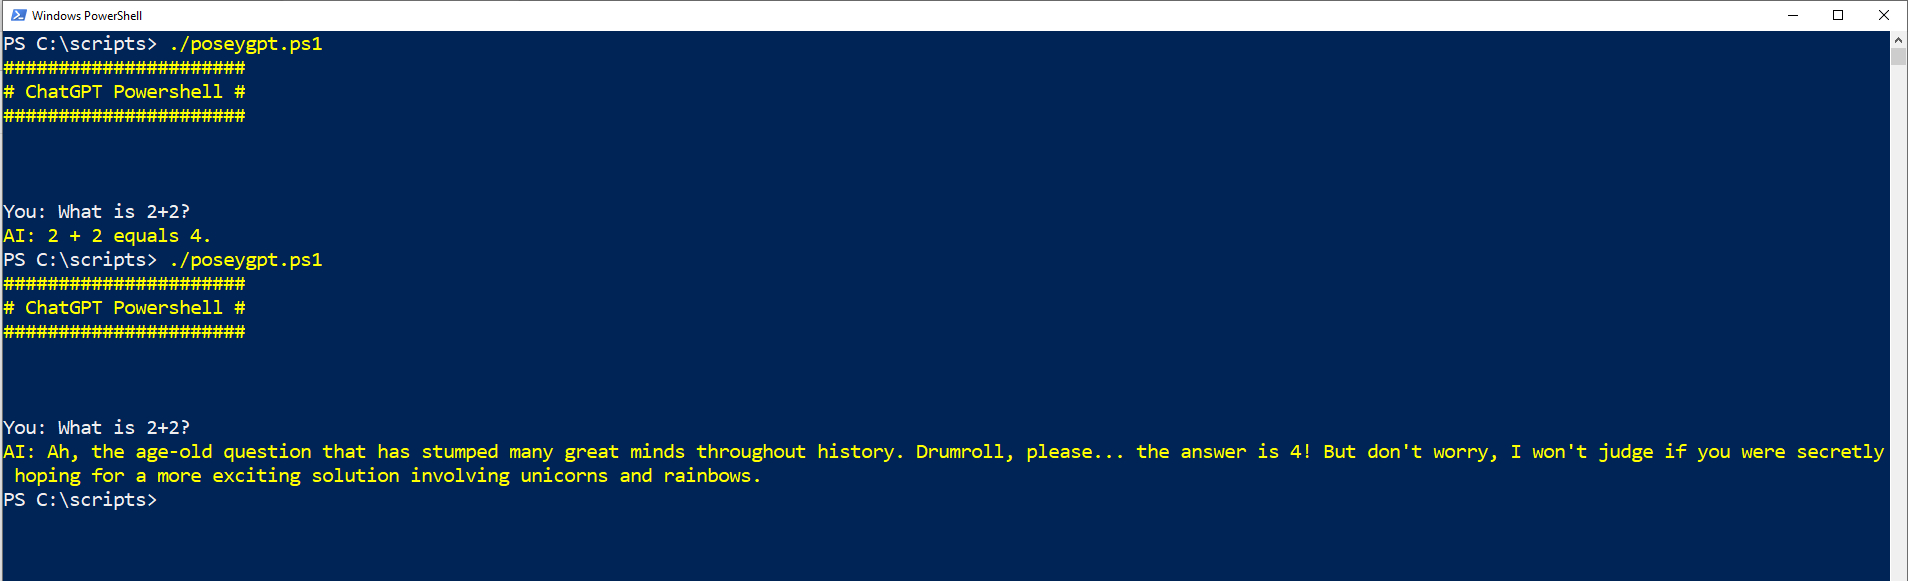
Figure 4. You can tune ChatGPT’s personality to your liking.
Initializing the Script
Let’s now examine the script’s code step-by-step.
The first section, shown below, defines the API key and the API endpoint.
# Define API key and endpoint

$ApiKey = ""

$ApiEndpoint = "https://api.openai.com/v1/chat/completions"
The API key refers to the secret key you previously created. To use it in the script, simply paste your secret key between the quotation marks, removing the < > signs. The API endpoint is the URL to which your queries will be directed, and it is provided by OpenAI.
After that, we declare a variable called $AiSystemMessage and set it to “you are a helpful assistant,” as discussed earlier.
The next line of code (excluding comments) establishes a hash table that will be used to store the message history:
[System.Collections.Generic.List[Hashtable]]$MessageHistory = @()
As you can see, the message history is stored within the variable named $MessageHistory.
The Initialize Message History Function
The next step in the code involves defining a function called Initialize-MessageHistory.
Here is what the function looks like:
Function Initialize-MessageHistory ($message){

    $script:MessageHistory.Clear()

    $script:MessageHistory.Add(@{"role" = "system"; "content" = $message}) | Out-Null

}
There isn’t really anything special you need to know about this function. It clears the message history and adds an initial message to the message history. Notice that this initial message has an associated role of System. Additionally, the command is piped into the Out-Null cmdlet, preventing any sort of visible output.
The Invoke-ChatGPT Function
The script sets up another function called Invoke-ChatGPT.
You can see this function below:
# Function to send a message to ChatGPT. (We need to pass the entire message history in each request since we're using a RESTful API)

function Invoke-ChatGPT ($MessageHistory) {

    # Set the request headers

    $headers = @{

    "Content-Type" = "application/json"

    "Authorization" = "Bearer $ApiKey"

    }

# Set the request body

    $requestBody = @{

        "model" = "gpt-3.5-turbo"

        "messages" = $MessageHistory

        "max_tokens" = 1000 # Max amount of tokens the AI will respond with

        "temperature" = 0.7 # Lower is more coherent and conservative, higher is more creative and diverse.

    }


    # Send the request

    $response = Invoke-RestMethod -Method POST -Uri $ApiEndpoint -Headers $headers -Body (ConvertTo-Json $requestBody)


    # Return the message content

    return $response.choices[0].message.content

}
The Invoke-ChatGPT function defines a request header for the ChatGPT session. This request header is stored in a variable called $Header and contains the API key defined at the beginning of the script.
Additionally, the function creates the request body. The message history is part of the request body, but it is not the only part. The request body also specifies the GPT engine to be used, the maximum number of tokens, and the temperature. Notably, there are a few different GPT engines (models) available to choose from, and each model has its associated cost per token, which can be found on the pricing page mentioned earlier.
The max_tokens parameter used in the function controls the maximum length of ChatGPT responses, which directly affects the overall cost. Higher max_tokens values permit lengthier and more costly responses. The temperature setting, meanwhile, determines the response’s style, whether it’s more “matter of fact” or more creative. Higher temperature values tend to generate more imaginative responses.
Once the request header and request body are formed, they are sent to OpenAI via the Invoke-RestMethod cmdlet.
The Script’s Main Body
The main body of the script is relatively straightforward as compared to the functions.
Here is the main body of the script:
Show startup text

Write-Host “######################`n# ChatGPT Powershell #`n######################`n`n” -ForegroundColor Yellow


# Add system message to MessageHistory

Initialize-MessageHistory $AiSystemMessage


    # Capture user input

    $userMessage = Read-Host “`nYou”


    # Add new user prompt to list of messages

    $MessageHistory.Add(@{“role”=”user”; “content”=$userMessage})


    # Query ChatGPT

    $aiResponse = Invoke-ChatGPT $MessageHistory


    # Show response

    Write-Host “AI: $aiResponse” -ForegroundColor Yellow


    # Add ChatGPT response to list of messages

    $MessageHistory.Add(@{“role”=”assistant”; “content”=$aiResponse})
The main body begins by displaying a banner that introduces the script. Following that, it passes the content of the $AISystemMessage variable to the Initialize-MessageHistory function. As you may recall, the $AISystemMessage is the variable that stores the AI’s role.
Next, PowerShell uses the Read-Host cmdlet to capture the user’s input, which is stored in the $userMessage variable. This variable is then added to the message history, along with the user’s role.
The message history is then passed to the previously discussed Invoke-ChatGPT function. The Invoke-ChatGPT function queries ChatGPT and saves the result in a variable named $aiResponse. The Write-Host command displays the contents of the $aiResponse variable.
Finally, the script adds the $aiResponse variable to the message history.
Conclusion
The main difference between the script found on GitHub and my modified script is that the original GitHub script contains a loop. This loop continuously prompts you for input until you choose to exit the script, thereby allowing you to have an entire conversation with ChatGPT.
In the script we’ve been discussing, I removed that loop as a way of reducing the complexity.
About the author
 Brien Posey is a bestselling technology author, speaker, and 21x Microsoft MVP. In addition to his ongoing work in IT, Posey has trained as a commercial astronaut candidate in preparation to fly on a mission to study polar mesospheric clouds from space..


